 best projects for iot robotics near me in bangalore.png)
FORCE SENSOR INTERFACING AND WORKING DETAILS ABOUT FORCE SENSOR REGISTER (FSR)
Force Sensing Resistors are also known as Force Sensitive Resistors or Force Sensors or just FSRs. They are low-cost and easy-to-use sensors specifically designed to detect physical pressure, squeeze, and weight.
You will find them in electronic drums, mobile phones, handheld gaming devices and many more portable electronics
While these sensors are great for measuring pressure, they are not great at finding how many pounds of weight they have on them. However, if you just want to find out “whether the sensor has been squeezed or pressed and how much” they are a good option for your next touch-sensing project.
The technology used in FSRs has been patented by Interlink Electronics which has been in operation since 1985. The most common types of FSR that you will easily find are the Interlink FSR-402 and FSR-406.
An FSR is nothing but a variable resistor that varies in resistance as pressure is applied to the sensing area.
It is made up of several thin flexible layers. The more it is pressed, the more resistive carbon elements touch the conductive traces and this reduces resistance.

There are a variety of FSR options out there, and a few key features such as size, shape, and sensing range that set them apart.
Most FSRs have either a circular or rectangular sensing area. Square FSRs are good for broad-area sensing, while small circular sensors can provide greater accuracy to the sensing field.

Another key feature of the FSR is its rated sensing range, which defines the minimum and maximum pressures that the sensor can differentiate between.
The lower the force rating, the more sensitive the FSR is. Any pressure beyond the sensor’s maximum range is unmeasurable (which can also damage the sensor). For example, a smaller 1kg rated FSR may provide more sensitive readings from 0 to 1kg, but cannot tell the difference between 2kg and 5kg weight
As we have said, FSR is basically a resistor that changes its resistive value depending on how much it has been pressed.
The easiest way to read the FSR is to connect the FSR with a fixed value resistor (usually 10kΩ) to create a voltage divider. To do this you connect one end of the FSR to Power and the other to a pull-down resistor. Then the point between the fixed value pull-down resistor and the variable FSR resistor is connected to the ADC input of an Arduino.
This way you can create a variable voltage output, which can be read by a microcontroller’s ADC input.
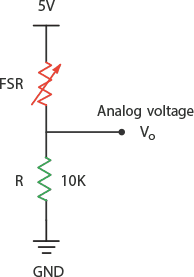
Note that the output voltage you measure is the voltage drop across the pull-down resistor, not across the FSR.
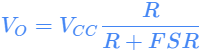
The output of the voltage divider configuration is described by the equation:
In the shown configuration, the output voltage increases with increasing force.
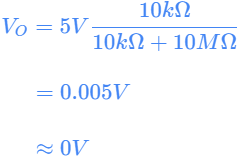
For example, with 5V supply and 10K pull-down resistor, when there is no pressure, the FSR resistance is very high (around 10MΩ). This results in the following output voltage:
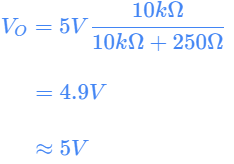
If you press really hard on the FSR, the resistance will go down to roughly 250 Ω. This results in the following output voltage:
As you can see, the output voltage varies from 0 to 5V depending on the amount of force applied to the sensor.
Below table indicates the approximate analog voltage based on the sensor force/resistance with 5V supply and 10K pulldown resistor.
It is quite easy to connect FSR to an arduino.
You need to connect a 10kΩ pull-down resistor in series with the FSR to create a voltage divider circuit. Then the point between the pull-down resistor and the FSR is connected to the A0 ADC input of an Arduino.
Note that FSRs are basically resistors. This means that you can connect them either way and they will work fine.
For our first experiment, we will read the sensor data from the ADC pin of the Arduino and display the output on the serial monitor.
The code is pretty straightforward. It just prints out what it interprets as the amount of pressure in a qualitative manner. For most projects, this is pretty much all that’s needed.
int fsrPin = 0;     // the FSR and 10K pulldown are connected to a0
int fsrReading;     // the analog reading from the FSR resistor divider

void setup(void) {
  Serial.begin(9600);
}

void loop(void) {
  fsrReading = analogRead(fsrPin);

  Serial.print("Analog reading = ");
  Serial.print(fsrReading);     // print the raw analog reading

  if (fsrReading < 10) {
    Serial.println(" - No pressure");
  } else if (fsrReading < 200) {
    Serial.println(" - Light touch");
  } else if (fsrReading < 500) {
    Serial.println(" - Light squeeze");
  } else if (fsrReading < 800) {
    Serial.println(" - Medium squeeze");
  } else {
    Serial.println(" - Big squeeze");
  }
  delay(1000);
}

The sketch begins with the declaration of the Arduino pin to which FSR
and 10K pull-down are connected. We also define the variable fsrReading which holds the raw analog reading from the FSR.
int fsrPin = 0; int fsrReading;
In setup function of code we initialize the serial communication with the PCvoid setup(void) { Serial.begin(9600); }
In loop function, we take the analog reading from the FSR resistor divider and display it on serial monitor.
As mentioned earlier, the output voltage of the sensor is between 0V (no pressure applied) and approximately 5V (maximum pressure applied). When the Arduino converts this analog voltage into digital, it actually converts it to a 10-bit number of range 0 to 1023. So you will see a value between 0 and 1023 in a serial monitor, depending on how hard you squeeze the sensor.
fsrReading = analogRead(fsrPin);

Serial.print("Analog reading = ");
Serial.print(fsrReading);

Finally, we print the amount of pressure measured qualitatively.

if (fsrReading < 10) {
	Serial.println(" - No pressure");
} else if (fsrReading < 200) {
	Serial.println(" - Light touch");
} else if (fsrReading < 500) {
	Serial.println(" - Light squeeze");
} else if (fsrReading < 800) {
	Serial.println(" - Medium squeeze");
} else {
	Serial.println(" - Big squeeze");
}